At some point or another we all must part with garments we love..... You know the ones, the favourite pair of jeans that is now more holes than fabric, the top that fits 'just right' but is covered in stains and has those abhorrent yellow armpit rings. You hate to lose them, but wouldn't be caught dead wearing them in public!
I recently went through my wardrobe on the annual purge and what should I find but my, as a former coworker once called them, 'po' boy capris'. I love these stupid pants to death! And they're just that..... Dead. I picked them up at the local Goodwill for $6 about........ 8 years ago now. I wore these things everywhere! They had a nice cut and that bleached denim look you can only get from 10+ years of washing. I loved them!! Then the fateful day came when I got the inevitable 'thigh rip' that seems to ruin all my pants. However, rather than lamenting too much and throwing them away in a fit of frustrated despair, I continued to wear them over fishnet stockings and patterned tights. To make it a little less devastating I even encouraged my college pub buddies to add a few cool rips to 'punk them up' a bit. The end result was a tattered mess, but it seemed to make them wearable again, at least..... for a while.
My mother just about lost her mind when I came home wearing them under a short dress. She told me she'd be happy to do my laundry that week, but I learned my lesson from the 'plaid pants incident' when I was 15, no way was she getting her hands on these babies!!! As time passed I gained a bit of weight and the pants no longer fit me well, but I held onto them, and good thing I did!
My sister had a similar issue with a pair of jeans she had loved years ago. We put our heads together for a way she could save them. First idea was to rip them more and cover them in fake blood for a Zombie Walk. They went over smashingly! After that they were completely unwearable in public so we decided to take out the inseam and make them into a long skirt. We dug through my bins of fabric in search of plaid. What do you know, I had about 5 different plaid prints! We set to work using the larger pieces to make panels between the legs and the smaller pieces to patch up the holes we had made. The pièce de resistance was using the wider rips and a few large pieces of plaid to make deep hidden pockets. The concert skirt was born! We call it the concert skirt because you can fit 6 tall cans of beer into each pocket which makes it perfect for the pre-drink bus/subway ride when going to a punk show in Toronto!
So, the time has come to save my beloved po' boys and create a skirt. I found some skull and cross bones knit and some cotton with cute little sparrows on it while raiding my stash one day and set out on my thrifty adventure. The following ensued.....
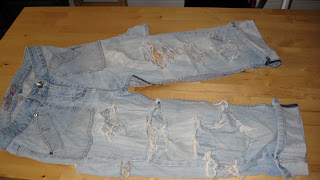
Here they are in their tattered glory. You can actually see through them to the table underneath!
The first step is tearing out the inseam. Leave the side seams intact, we're just adding basically a gusset of fabric to create the skirt. I apologize if it's hard to see but I've off set the front from the back, gives you a better idea of just how shabby these things are!
You'll end up with two flat legs like this, it's now just a matter of patching the holes and inserting the skirt panels.
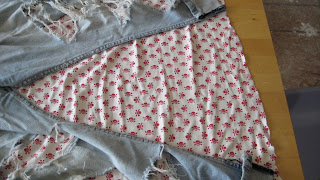
This is the fabric I chose for the skirts panels and pockets, super cute right? I managed to get this for $3/m !
And this is the Sparrow fabric I used for some of the front patches and the patches on the back. The holes on the back side of the pants were very wide and fairly close together so I opted for a cotton rather than a knit to patch them so they would have more stability!
Next step is to lay the jeans over the fabric for your panels to get an idea of how wide and long you'll need to cut. You should allow about 3-5 inches extra in the length for your hem. I cut my hem on a curve so that the panel would have more drapeyness and not look flat. It gives a much nicer effect. I used a 1 inch hem so that I could turn it under twice for a nice finish.
Here are the panels for both front and back. The back panel is the smaller triangle.
For the patches and pockets I simply eyeballed the sizes and cut pieces a little larger then I needed. You'll be trimming the excess fabric off once you sew it down anyway!
This is what the back ended up looking like when I was done patching. I ended up ripping the bum seam out about half way up and sewed it back together in a straight line. This reduced a lot of excess fabric and made the back panel much smaller. It also gives a more A-Line structure to the skirt and a better silhouette. The patches are simply pinned and sewn about an inch around the edges of the holes.
This shot shows where I stitched around some of the worn denim above one of the holes and gives a better idea of how far from the frayed edge I sewed.
Here it is! My newly improved 'Po' Boy Skirt' ! I turned the cuffs back up and tacked them down along the side seams so they would stay up. The cuffs were one of my favourite things about these pants and I didn't want to lose them! As you can see the skirt panel has a sort of wavy drape because of the triangular cut and the curved hem. It also gives me full range of motion so I can still kick some ass if need be!
Here is a shot of the back panel, you'll notice the back seam is sewn down about 5 inches from the bottom of my bum. The drape on the back is a little fuller than the front but this can be remedied by narrowing the triangle you use for the back panel.
And here's a picture to show the 'hidden pocket'. They're indiscernible from the other patches when you look head on, but I'm sure they will come in handy! I sewed the pockets in after patching the lower hole and then simply sewed around the top of the pocket hole, down the sides and below the lower patch for the bottom! They may not be able to hold 6 tall cans but I imagine I can sneak a mickey of gin around :P
There you have it! How I saved my favourite pants using fabrics I already had! I used about 1m of fabric for the panels and the patching, and when you think about it, it cost me nothing for this project since I had the pants and all the fabric for a few years already. If I were to go out and buy the stuff for this project it would cost somewhere around $10 (even less if you hit up the thrift shop on a sale day and raid the remnant/clearance area of your local fabric store!).
Times are tough out there and it helps to use every resource you have. Necessity is the mother of Invention. My nostalgic need to keep these pants out of the rag pile prompted me to create something new and fun. Hopefully I'll get another 8 years of wear out of these ol' po' boys :)
As always my darlings.........
Keep kreepin'!!
Missa Deadlove xoxo


No comments:
Post a Comment